Saturday, October 31, 2015

Salted Caramel Sauce and My Fourth Birthday!


Salted Caramel Sauce & Birthday #4!
 I am celebrating my fourth year in bloggingdom!

Celebrating with one of my favorite things..Caramel Sauce.

I made it for the first time last month, and have make several batches since then. 

Some dark, some medium and some light in color, with medium hitting just the right flavor for me.

Hubby and I have been enjoying many of the fall festivals in North Georgia this month. Of course the first thing I was drawn to were all the yummy festival foods and treats. That's when I saw those cute little apples wedged and drenched in caramel sauce. We even had our own caramel apple booth set up @ our church festival this week!

Here is my version.

My grandbabies came over just after this little guy finished his photography session..it did not survive. They loved it!
 Birthday number four and looking for many more!
Pictured below are the ingredients you'll need.
 In the end I went with regular granulated sugar.
Heavy cream, butter, water, sugar..
Vanilla,
and beautiful salt. I am a salt fiend.
Combine water and sugar in a 2 quart, heavy bottomed saucepan. Cook over medium heat without stirring. Swirling the pan is okay.
It takes mine approximately 30 minutes to reach this medium amber color.
Slowly pour in heavy cream while stirring. Turn heat to low and stir till incorporated.
Remove from heat and add butter, vanilla and salt, stirring till smooth.
Pour your beautiful, finished caramel sauce into a glass jar.
 Let cool and store in refrigerator.
Oh my yum!

So many delicious ways to use your caramel sauce.
Drizzling this golden syrup over a warm apple pie topped with ice cream comes to mind..
Salted Caramel Sauce

1 cup sugar
1/2 cup water
3/4 cup heavy cream
2 Tablespoons butter
1 teaspoon vanilla 
1/2 teaspoon salt

In a 2 quart, heavy-bottomed saucepan, stir together sugar and water. Cook over medium heat without stirring. Swirling the pan is okay..and kinda fun!
Cook mixture until you see it turning a medium amber color.
This process takes about 30 minutes.
Slowly add cream-turn heat to low- while stirring. It absolutely will spitter, spatter and foam up in the pan. Keep stirring till incorporated. Remove from heat and add butter, vanilla and salt. Stir until smooth and pour into glass jar.
Let cool. Store in fridge. 

After reading many opinions on just how long this yummy stuff will last, I've decided to go with the expiration date on my package of heavy cream.

Thanks for stopping by.

Comments and new members just add to the birthday fun!

Have a sweet day, Karen   :o)

Monday, October 26, 2015

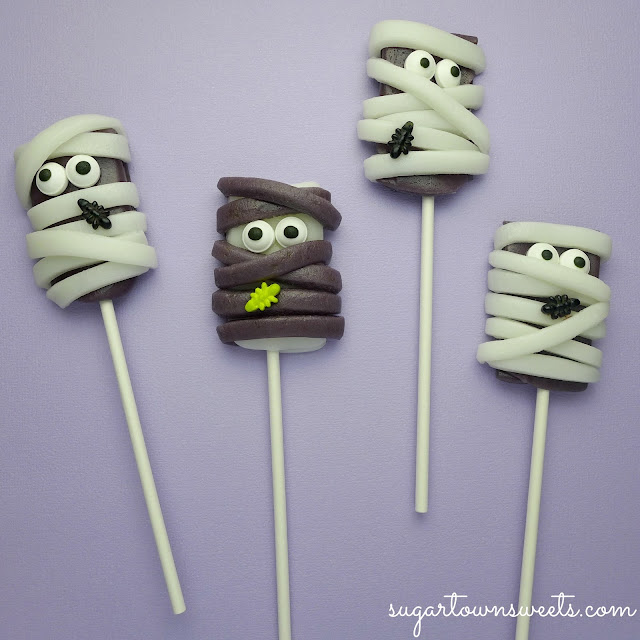
Yummy Mummy Airheads Pops

  
 I'm just popping in really quick today..
So you can make these super easy mummy treats..
And still have lots left of your day! *wink*

I'm lovin' this little guy!
Airheads are just so much fun..oh the crafts you can create!

Our mummys require no baking, no dipping, no cooking, no kidding.

Ingredients and tools needed:
Airheads
candy eyes
lollipop sticks

not pictured:
long sharp knife
1/4 teaspoon water
For each mummy pop, you will need two Airheads-I used grape and white mystery-along with two candy eyes, one bug sprinkle and one lollipop stick.
Cut the white Airheads into five strips. You will then cut each strip in half.
Assemble your pops following the photos below. I used just the tiniest dab of water to attach the eyes and bugs. Give it a minute to *tack up* enough to stick. As you place and wrap the mummy strips, the natural tack of the candy will stick to itself. So easy!
 I feel like singing..King Tut!

"now if i'd known they'd line up just to see him..
i'd taken all my money and bought me a museum, King Tut!"
 I made one purple mummy just for fun!
HELLO!

Thanks for stopping by.

Comments and new members don't scare me..hehe!

Have a sweet day, Karen   :o)

Sunday, October 25, 2015

Coca~Cola Cake

If you've never tasted Coca~Cola cake, you just gotta, gotta, gotta try this recipe!

It is seriously moist and decadent and yummy and fudgy and..so easy. No mixer needed.   :)

So, a few weeks ago, I took my daughter and grandbabies to the World of Coca~Cola.
 The kids love it and -of course- wanted to go straight to the Taste-it! room where there are many different flavored beverages to sample.
 I must admit it's my favorite room too!

There is one flavor in particular that everyone needs to try once. It's called, Beverly. 
Here is one of my adorable grandsons after he tried it. haha..i love it! Umm..his face, not the drink! *wink*
Soo..with that said, Beverly you're fired! Well, maybe not. You might just like it.

But..since I do not, we are sticking with the tried and true Coca~Cola! And, we are using it in the yummy cake recipe I found in this gift shop cookbook!

This cake will be a sweet addition to our family Thanksgiving get-together and bake~a~pallooza..which is only four and a half weeks away! I know this because when my daughter took her first bite, she was like, "you ARE making this for Thanksgiving..right?"

Well of course dear, what are mothers for?  ;o)
Mmmm..can you stand it?!
Look what happens when you pour that hot icing over the hot cake. 
It just seeps down and soaks into the delicious cake and makes it ever so moisty-er and fudgy-fied. *sigh*
Let's bake!
We'll need the usual sugar, flour, eggs, vanilla, cocoa, baking soda and butter. But we'll also add marshmallows, coconut oil and Coca~Cola.

In a medium bowl, whisk together the sugar and flour. Stir in marshmallows.
In a small saucepan, combine butter, coconut oil, cocoa and Coca~Cola. 
Stir together and bring to just a boil.
Pour this hot mixture over the sugar/flour/marshmallows stirring to mix well.
Stir baking soda into buttermilk and add to batter.
Add eggs and vanilla bean paste. Just look at at those vanilla bean seeds!
Pour cake batter into prepared 13x9 pan. Bake @ 350 degrees for 35-45 minutes or until cake springs back when lightly touched in center.
While cake is baking, prepare the icing. I made mine during the last 20 minutes or so of baking time.

Ingredient list: Coca~Cola, cocoa, confectioners sugar, butter and vanilla.
*optional~mini chocolate morsels
In a medium bowl, measure out 4 cups of confectioners sugar. In a small saucepan, combine butter, cocoa and Coca~Cola. Stirring over medium heat, bring just to a boil. Add hot mixture to confectioners sugar stirring to mix well. 
This stuff is crazy good!
Pour icing over hot cake and don't even bother trying to resist licking the bowl. 
I know I can't be the only one!  ;o)
Yum...
Coca~Cola Cake 
(lightly adapted from Coca~Cola Refreshing Recipes book)

2 cups sugar
2 cups all-purpose flour
1 1/2 cups mini-marshmallows (next time I'll use 2 cups)
1/2 cup (one stick) butter
1/2 cup coconut oil (original recipe calls for vegetable oil)
3 tablespoons unsweetened cocoa
1 cup Coca~Cola
1 teaspoon baking soda
1/2 cup buttermilk
2 large eggs
1 teaspoon vanilla bean paste (original recipe calls for extract)

Preheat oven to 350 degrees.
Grease and flour 13x9 cake pan. (i use coconut oil)

Stir sugar and flour together in a medium bowl. Add marshmallows. In a small saucepan, combine butter, coconut oil, cocoa and Coca~Cola. Bring just to a boil and pour over the dry ingredients, stirring to mix well.
Lightly beat eggs before pouring into cake batter. Stir baking soda into buttermilk and add to batter along with vanilla, mixing well. 

Pour into prepared pan and bake 35-45 minutes or just until cake springs back when lightly touched in the center.
Mine was done @ 38 minutes.
You will ice the cake as soon as it comes out of the oven, so prepare it in the last 20 minutes or so of baking time.

Coca~Cola Icing

1/2 cup (one stick) butter
3 tablespoons unsweetened cocoa
1/2 cup Coca~Cola
4 cups confectioners sugar
1 teaspoon vanilla bean paste (original recipe calls for extract)
*optional~mini chocolate morsels

In a small saucepan combine butter, cocoa and Coca~Cola.
Bring just to a boil and pour over confectioners sugar mixing well. Add vanilla. Pour icing over hot cake.
Oh. My. Goodness!
This is seriously the best icing..like evah!

Recipe also calls for pecans but I didn't want the crunch. Instead, I opted for some yummy mini chocolate morsels sprinkled on top of my finished cake!
Now y'all know you wanna leave me a comment!

Thanks for stopping by.

Have a Sweet Day, Karen   :o)

Thursday, October 15, 2015

Pumpkin Patch Candy Spoons


I've not had very much time in my kitchen lately, but I wanted to create a seasonal treat and this is what I came up with.

Requirements included simple, cute and quick.
I think I've got it!

Pumpkin Patch Candy Spoons.
An easy pumpkin treat that you can make in no time at all.
I'm talking lickety-split people!

~I have a couple other pumpkin patch treats as well. 
Click here and here to see them!~

Twizzlers, candy melts and soup spoons are all you need. I'm using soup spoons as I like the more rounded shape they give the pumpkins.
 Melt the candy according to the package directions.
I melted mine in a small cup, poured the candy into the spoon and gave it a swirl using the tip of a knife.
I cut little stems from the twizzlers and pressed them into the top of each spoon.
Let them sit to harden. Wrap them in cello bags for a cute favor at your fall parties, use in goody bags or just let the kiddos help you make and eat them just for fun!
Happy Fall Y'all.

Thanks for stopping by.
Comments and new members are always welcome!

Have a sweet day, Karen   :o)