
Remember the Peppermint Stocking Ornaments I made last year..well you just gotta have some mittens to go with! So here they are..sweet and easy of course. The Christmas season is my favorite and I'm so excited that we are getting our tree next weekend..earlier than ever before. Whoo hoo! I'll wait to say Merry Christmas until we've had my next favorite holiday..Thanksgiving. *wink*


I found these at the Dollar Tree. They melted up perfectly!

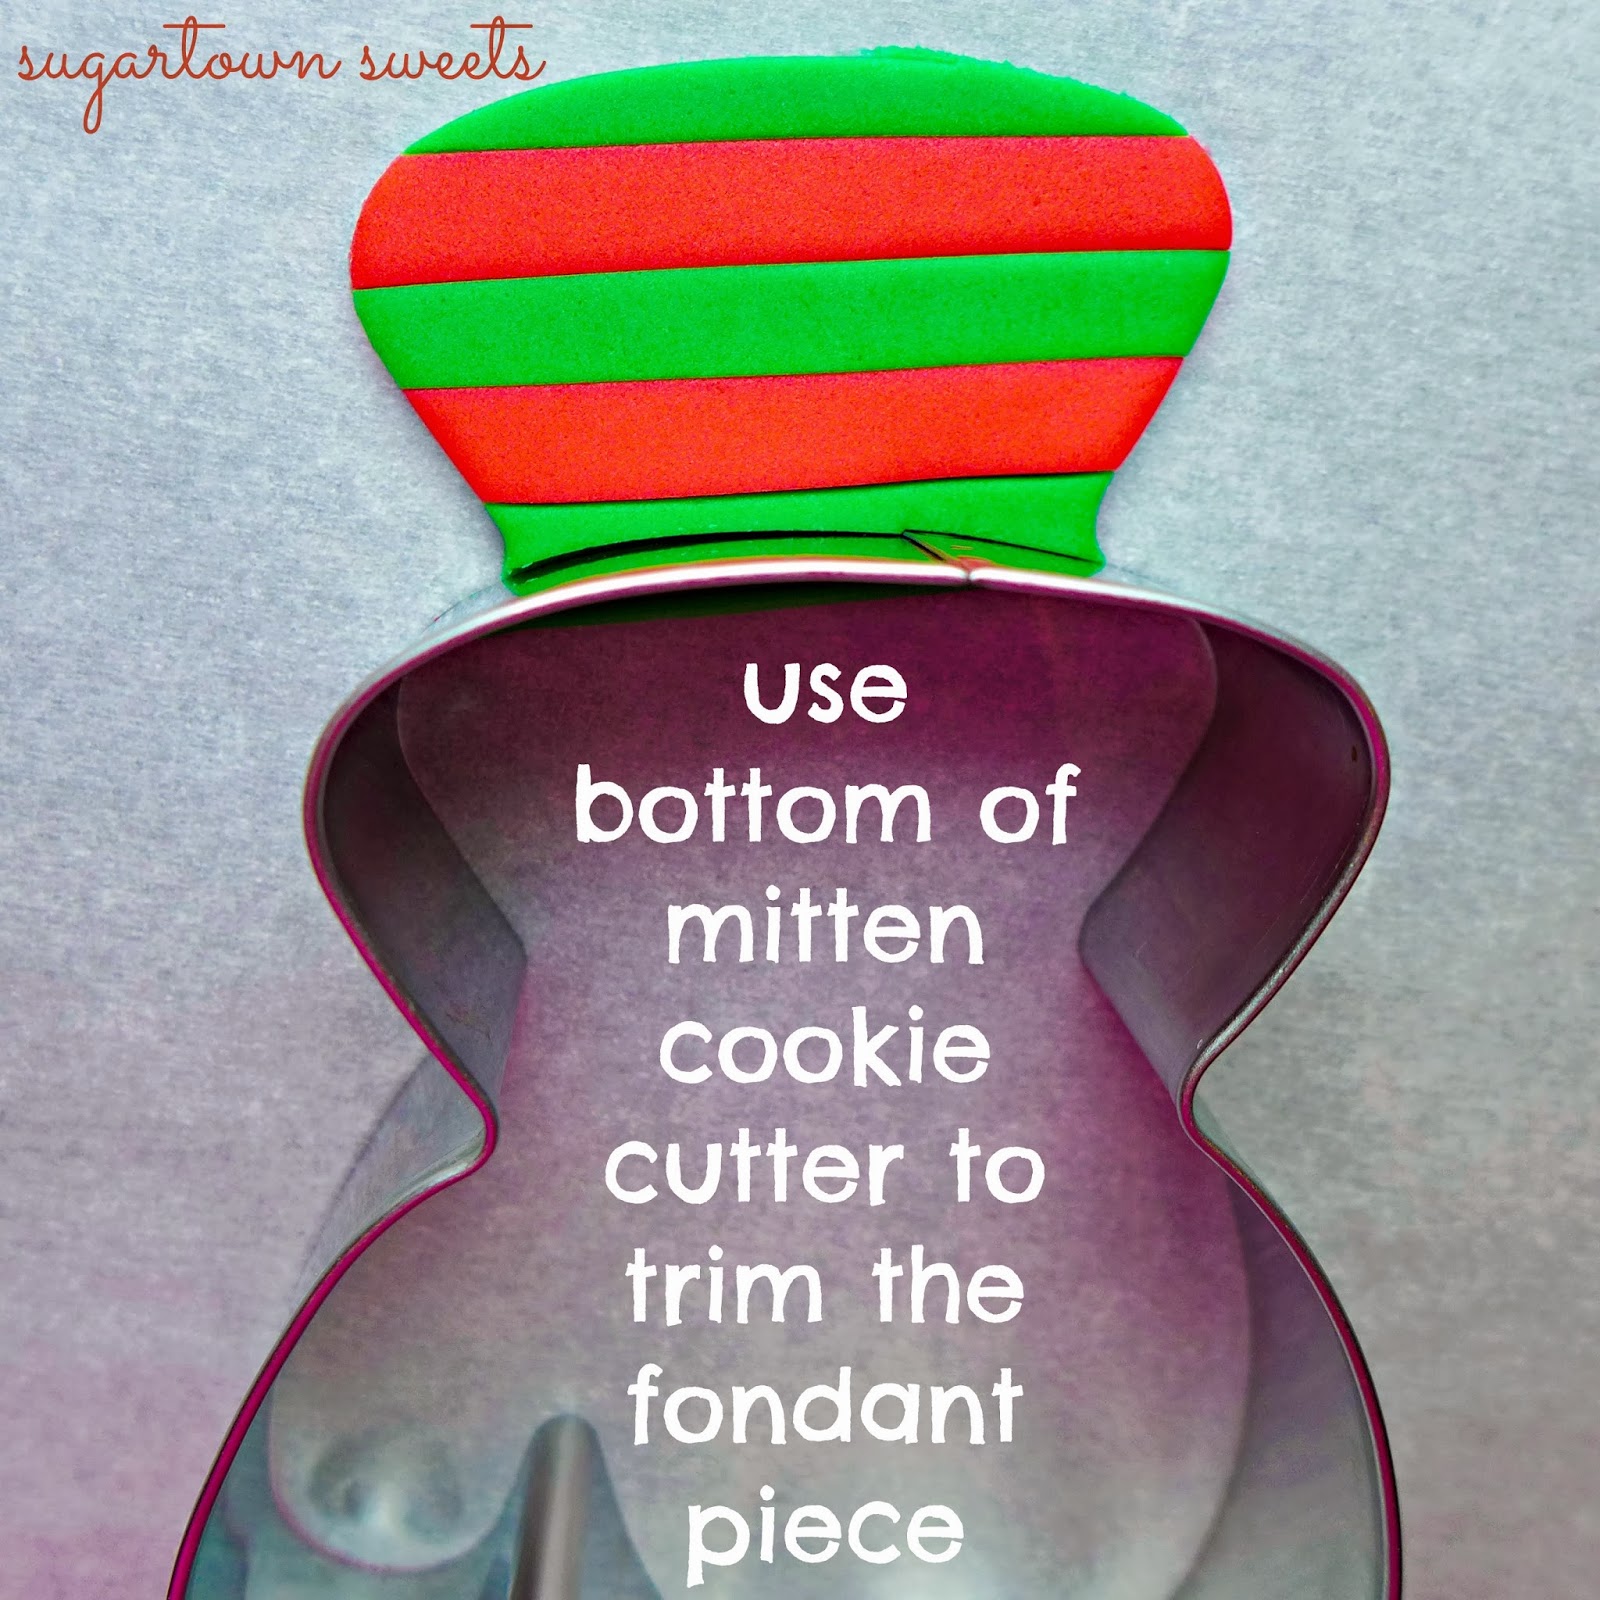
It should be fairly easy to find a mitten cookie cutter..I bought mine in a set last year at Michael's craft store. I also used a Wilton #10 decorator tip.

Using your cookie cutter as a guide will help you determine how many, and where to position your candies. Parchment paper is my liner of choice.

Place pan in your pre-heated oven.

At the 10 minute mark (or when they look like the candy in the photo) remove from oven and firmly press cutters into melted candies.


Around the 3-4 minute mark, (though still fairly warm) you should be able to remove candy from cutters. Gently press and twist tip through and remove. Now pick up the candy piece and gently press cutter completely through. Lay the piece back on pan to finish cooling.

Unless you have left and right mitten cutters, you can try my method. I used the dull side of cutter to cut candy. I then used one hand to hold it down on pan while using my other hand to lift up and break candy from the outside. Does that make sense? I hope so!


You'll need these...

..a fondant roller and candy sprinkles to decorate your mittens.


Follow photo below to get that nice finished edge on cuff.
Follow photo instructions below. While the peppermints aren't necessarily sticky, the natural tack of the candy and fondant stick together nicely on their own.

**Warm Candy Mittens**
 I used these yummy Twizzlers for the mitten "strings". Just pull off a string and tie onto ornament.
 Attach candy sprinkles with a dab of corn syrup.
 Thanks for stopping by on this super cool day: 11.12.13!
Wishing You a Sweet Day From
Sugartown Sweets!
Leaving a comment below will make mine!
Sign up for emails and never miss another post.


Wishing You a Sweet Day From
Sugartown Sweets!
Leaving a comment below will make mine!
Sign up for emails and never miss another post.

I LOVE these!!! You do such an awesome job, Karen!! I just pinned this to Pinterest so millions can see your handiwork! Woo hoo!!
ReplyDeletePeppermints remind me of church cause thats the only place I eat them,if I had the supplies and the talent I would make one for all the kids at my church,they would be delighted to get something so good and festive! You did it again sis! Great job!
ReplyDeleteYou've created some amazing things with melted candy, and this is my absolute favorite. They are a perfect pair. Pinning.
ReplyDeleteAmazing! You're so awesome at what you do. :)
ReplyDeleteWow! I love this..four comments..and all of them too sweet! Thank you all for taking the time to leave me a comment, and even pinning them!
ReplyDeleteThose are sooooo adorable!!!
ReplyDeleteThank you SO much! :o)
Deleteok-i haven't ever melted candy before, but can i ask why u would need to use the dull side of the cutter? couldnt u just turn the cut out piece over or does the back look different? these r so cute i wish there was a way to make them to use as tree ornaments. it is a tradition with my grandkids that every year they each make an ornament to give their mom for the tree. last year we made red and white candy canes using clay and these would go right along with them. i do have a few weeks yet, so i will start thinking of a way. thanx for the inspiration!!!
ReplyDeleteHi! The reason I used both the regular and dull sides, was to get a true pair of mittens. It's a little difficult to notice in the collage photograph, but the flip side of ornament does not have the same nice sheen as the top. As far as using them on the tree, I didn't do that. On the other hand, I still have the peppermint ornaments I posted last Christmas and I am going to hang these on my tabletop ornament stand! We have the same fun tradition here..I'm planning on making ornaments with my grandkids next weekend. :o) Let me know how they turn out if you make them. And thank you for taking the time comment! :o)
DeleteTo make them an ornament for the tree couldn't you just spray them with a clear coat of some sort? I'm not too savvy in the crafting department but it seems there has got to be a way to preserve these cuties for the tree.
ReplyDeleteThat's just what my daughter wanted me to do with these. I've wanted to try that, but I'm not sure what to spray them with. Also, I'm pretty sure it would ruin the fondant, so I would wait until they dried to apply it. Let me know how they turn out if you try it! :o)
DeleteUse clear acrylic. Acrylic spray is less than $5.00 in most general stores, or craft stores. Years ago, I had heard about using clear shellac and clear acrylic for food crafts to preserve them. I have not actually done this as I don't do a lot of crafts especially food crafts but for some reason this has ALWAYS stuck with me. I saw this again on instructions for gingerbread houses, so I think it would work on any candy craft including fondant. Shellac and acrylics are sealers so I can't see any reason why it wouldn't work on fondant. Just make sure that NO ONE especially pets and kids eat any food craft that has been sprayed with acrylic. Here is the instructions I recently saw for gingerbread houses: You can preserve your creation for years by spraying it with clear acrylic. Make sure you do this in a well-ventilated area and with cardboard behind it to catch the sprays. Let it dry completely and give it another coat. When it's completely dry, you can store it in a box that just fits.
DeleteThese are adorable! Not sure where I have been, because I have never seen this before...so cute!
ReplyDeleteThank you! These little mittens have only been around for about a week..I had so much fun making them. :o)
DeleteCan you remelt the scrap candy pieces?
ReplyDeleteI've not tried that. I'm sure you could, although you won't get that same pretty pattern that you get with the whole and intact peppermints. Let me know how they turn out if you try it! :o)
DeleteSpray clear acrylic or clear shellac (craft or hardware stores) on food crafts to preserve them for years. Be careful of those fumes while spraying...outside would be best. Just make sure that no one eats them after they have been sprayed!! . One day soon I will stop being Anonymous and have a real name (LOL). But you can call me the amateur gingerbread lady as that when my food craftiness begins to come out. I submitted a much longer reply previously in response to another Anonymous person. :-)
ReplyDeleteThank you Gingerbread Lady! :o)
DeleteNo need to remelt unused portions. We break it into bite sized pieces and put it into our favorite Christmas candy dish.
ReplyDeleteThat is a great idea Julie! Thanks for the tip. :o)
DeleteI'm excited to find these--we're planning a candy themed tree for the kids. Roughly, what size cookie cutter did you use? Trying to figure the scale...Also, how many mittens did you get out of the bag of mints? Thanks for sharing this fantastic idea!!!
ReplyDeleteHi there! I'm so happy you like them! As for the cookie cutter size, mine was 3.5 inches by 2.5 inches. I used 15 peppermints per ornament. I don't have a bag of candy on hand or I could tell exactly how many I made. I will let you know as soon as I can pick up another one. Thank you so much for stopping by..and Happy Crafting!
DeleteThese are beautiful.
ReplyDeleteThank you so much to the McBride family!!
DeleteHave you tried putting the candies in the cookie cutter on the cookie sheet and melting them that way?
ReplyDeleteI have tried that but I prefer the finished look better with melting first and then cutting. But I do think both methods turn out sweet ornaments! :)
DeleteHi Karen,
ReplyDeleteLove these peppermint mittens! I'm writing a story for Delish.com about edible Christmas ornaments and would love to include these in the post. Please contact me at rpark@hearst.com to be featured. Thanks and keep baking!
These are adorable!! I am going to make them as ornaments for the tree, and won't be eating them. Do you think that modeling clay would work in place of the fondant?
ReplyDeleteThank you Megan! I think modeling clay is a great idea!
DeleteI love these! Can you eat them if you do not put any clear acrylic?
ReplyDeleteThank you Suzanne! Yes you can! These are 100 percent edible..how great is that?! These are so much fun to make. :o)
Delete