Friday, December 29, 2017

Happy New Year Cookies!


I have been blessed with a wonderful year.
My grandbabies, children, and hubby are happy and healthy. So that makes me happy too!

I pray God gives us ALL an amazing new year in 2018!

 We can start with these cookies!
Sweet and sparkly cookies; as any new year treat should be! 😉
Prepare your favorite cookie dough.

Once again, I've used Lila Loa's vanilla cookie recipe. It's so good!
On a lightly floured surface, roll out cookie dough to 1/4 inch and cut out stars.
Bake your stars @375 degrees for 7-9 minutes. I bake mine for nine as I like them a little crispety!

If you like your cookies softer, stop at 7 minutes. 
I used this Wilton molds set for my fondant numbers along with, black and gold sprinkles, canned frosting, and black fondant. You will also need cornstarch, corn syrup, a food safe paintbrush, and a spatula.
 Yes, cornstarch, I missed you so much today. You see, in my absent-mindedness, I used powdered sugar to dust my fondant mold.

I molded my numbers twice and nearly gave up as they were sticking to the mold. You might think I would have realized the problem. I did not. Hence my wonkified numbers.

Remember, bakers, dust your molds with cornstarch!
 We'll add our black sprinkles to our 2018 by painting corn syrup on the numbers first and then shaking on the sprinkles.
What---year---is---it??
To make our beautiful and sparkly gold star cookies, use a spatula to spread the frosting and then shake on those gold sprinkles. Attach numbers to cookies with a dab of frosting to the backs.

Now you have your edible, New Year's Eve party decorations all ready for your hungry guests!

What a great way to start off the New Year!

Hope you have a blessed and sweet one, Karen 😊

Thursday, December 14, 2017

Chocolate "Gingerbread" Cookies~Tangled in Christmas Lights!

           
Can we call these gingerbread cookies when they're made with chocolate cookie dough? Yes, we can! Because this is not just any chocolate cookie dough.  It's Georganne's awesome recipe from Lila Loa! She makes some of the most amazing cookies!

Cookie baking and decorating is just one of our Christmas traditions. Choosing new ornaments is another. Every year, at least one of these ornaments will be personalized.
I LOVE this one!

We found it at Personal Creations.

And it is my inspiration for today's post!
To make and decorate these cookies, along with the chocolate cookie dough, I used:
gingerbread man cookie cutters, icing tubes in white, green and black, and candy coated sesame seeds.

I also used Wilton tips #2 and #3 with my Wilton brand icing tube.
 Roll out this delicious, chocolaty cookie dough on a lightly floured surface.
Cut out with cookie cutters and place on parchment lined pan.
Here comes the fun part!
Slice off the inside arms..wait! Where's my Christmas cheer? That should not be fun! hehehe!
 Place and gently press the arms onto the outside shoulders of the chocolate gingerbread peeps.

Next, lift one inside leg and place on top of the other.

Bake cookies @ 375 degrees for 7-10 minutes.
So here's where it gets tricky for me.
I can not pipe. 

If you feel that you're in the, #cantpipeclub, with me, go ahead and make these anyway. If I can do it, I know you can too!
Whew! Faces done!
Using the green icing, pipe the tangled lines onto cookie.
Now let's decorate with our Christmas lights by placing candy sesame seeds atop the strings.

Aren't these sweet?!
 So I had this tiny little gingerbread cutter..and made a wittle, bitty cookie! 
This is where I used my #2 decorator tip for the mouth. It's okay if you don't get right on the first try. I had to pipe and scrape off the icing more than once!

Kudos and awe to all you wonderfully talented cookie decorators! For me, this is just a *pipe* dream! ha 😜

Wishing you all a Sweet & Merry Christmas, Karen

Happy Birthday Dear ol' Dad. I 💗 You!

Friday, December 8, 2017

Epic-Mega-Giant Reese's Rudolph and His Mini-me!

It's Rudolph and his mini-me! Well, almost his mini-me!

They may not have the same antlers, but that's because I'm out of those tiny candy canes. And, he kinda only made it to the party because I wanted to show how huge this giant Reese's is!

Half a pound huge! 4 inches across and 1 inch thick huge!

It's still hard to tell in the photo just how big this thing really is, and I had to guard it because when my hunky hubby saw it, he really wanted to swipe it!

He will get a nice surprise tonight to find out it's his after-dinner dessert!

I have a big pot of chili simmering on the stove while the snow is falling today in Fayetteville, and it is beautiful! The snow, not the chili!😜
To create the giant Rudolph, you will need:
One Mega-Giant-Epic Reese's Cup
Regular size candy canes
A large set of eyes-I used the ones from this Wilton's kit
Red Peanut M&Ms
Ready-made frosting
This Reese's cup looks like a pie!
Use a long, sharp, heavy knife to cut/trim the ends off unwrapped candy canes.
I used one of those paper straws to make the opening for the candy antlers.
It was the perfect size.

Just give it some good pressure and twist until straw pushes through the chocolate cup.

If you need to improvise with something else and your opening becomes too big, just dip the ends of the candy canes in a little melted chocolate before inserting into Reese's cup. This will stabilize antlers when chocolate sets. 
Make sure the holes line up evenly or your antlers will be lopsided. I mean, who wants loopy, lopsided antlers?   
Use the icing to attach candy eyes and nose.
Now look at this yumminess!!
You know you need one!


To make the mini-me, I used:
Mini peanut butter cup
Tiny candy eyes
Red Hots candies for the nose
Candy antlers from the same Wilton kit above
Rudolph the Red-Nosed Reindeer will be on CBS tomorrow night (Dec. 9th) @ 8pm!

Will you be watching? I will!

Merry Christmas, Karen 😊

Saturday, December 2, 2017

Fireplace Candy Bar Craft

"Oh, the weather outside is frightful, but the fire is so delightful...especially when it's made of chocolate!!

Don't you love it when you can have your fire and eat it too?! Well, today you can as I make the last-i think-of my Kit Kat crafts.

Christmas just isn't Christmas without a fireplace, so how about a platter full? I think Santa would appreciate these on Christmas Eve with a nice, tall, cold glass of milk.
 To make my fireplace crafts, I used:
Full size Kit Kat bars
Fondant:black, white, and red
Decorator Icing Tubes:black, orange, and yellow
Decorator Icing Tips:Ateco #17, and a small round tip *not pictured
Stocking cutter-1 1/2 inch-I've had mine so long I don't remember where bought it, but this one looks very similar.
Fondant cutter-you can also use a sharp knife
Fondant roller *not pictured
These Wilton Santa Claus icing decorations are so cute, but I ended up not using them for this craft.
 We'll begin by cutting out out fondant pieces.
Roll out black fondant and cut out a 1 inch by 1 1/4 inch rectangle for each candy bar fireplace.
Ohh, let's make some adorable, tiny stockings!

Roll out red and white fondant. Cut out white stockings and then red stockings. Cut off just the top from the white stocking and attach it to red stocking with a dab of water.

I decorated my stockings with Christmas sprinkles and sparkling sugar.
 I piped black decorator icing with a small round tip for my "brick mortar".
This sweet little fire!

After attaching the black fondant piece to candy bar, tip #17 was perfect for piping the fire.
I piped the orange first and then topped that with the yellow.

It's beginning to feel a lot like Christmas!
Let's hang those stockings by the chimney with care..with just a dab of frosting!
These roaring fires..so cozy!

Wishing you all a sweet and Merry Christmas!

Stay warm, Karen 😊

Friday, November 17, 2017

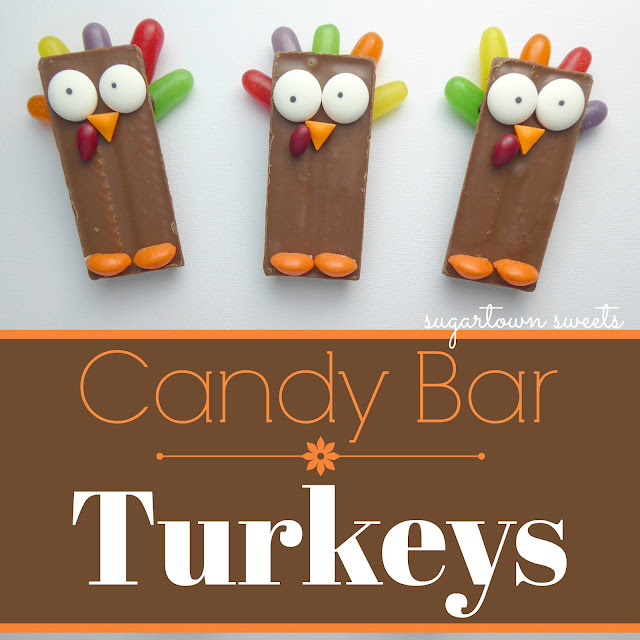
Candy Bar Turkeys


Y'all just go ahead and grab some of your leftover Halloween candy. We have gobs and gobs because we only had 17 Trick-or-Treaters!
Aaannd, I'm the only one in my family to have any at all!

Back in the day, my parents passed out tons of candy as all us neighborhood kids went from house to house getting treats for hours.


Really, it's been like this for the past few years, so when the kids come to the door, hubby gives them huge, double fisted handfuls! They love it!

So now we get to move on to Thanksgiving! Yay!
Tonight, my Mom, sisters, daughter and I had our annual conference call where we all decide what we're making for the big day.
Kind of funny because we each make the same thing every year!
It's just our tradition!

Turkey treats are also one of my traditions and this one is really easy.😃
I keep all kinds of sprinkles and candies on hand for decorating treats. Even if you don't, the items I used for my turkeys should be easy to find.

I like Michael's and JoAnn's craft stores to find sugar related decorating items. I also like Fancy Flours and Amazon.

When I'm out shopping, I look for unusual sprinkles. My grandbabies are always amazed at how many different bottles I have falling out of neatly arranged in my cabinets.
Melt chocolate chips. Use this as your "glue" to attach Mike and Ike "feathers" candies.
My kitchen absolutely will look like a tornado hit it when I'm sugar crafting. Am I the only one? 😏
Time-out for an ink-blot test!
One the chocolate has hardened, turn candy bar over to attach remaining turkey parts! 😜
I forgot to take a photo of cutting the orange Skittles in half to use as turkey feet. But y'all already know how to do that. Right? hehehe!

Now your turkey/turkeys are done and it took way less time than the 3.5 hours that the real one will take next week!
Wishing you all a sweet Thanksgiving filled with warm, happy memories!

Gobble, Gobble baby! Karen