Thursday, March 29, 2012

He Is Risen! Candy Cross Ornaments


Easter

What a wonderful time of worship, and honoring our Lord and Savior Jesus Christ!
Today, as I was reading through my April issue of
 In Touch magazine, I thought this would be perfect for today's post! The following is taken from 4.4.2012's daily devotion.

"What does the cross mean to you? Many people in the world today view it {as merely} a symbol of Christianity. Every time you see a cross, remember what it really was-an instrument of execution. Then, thank Jesus that he was willing to be crucified so the Father could forgive you {and me} of sin. Though the scene of our redemption was horrendous, Christ turned the cross into a place of great triumph." John 3:16

Wishing you all a Blessed Easter! 

As I made my Stained Glass Easter Egg Ornaments last week, I knew I wanted to make these into crosses. I did not have the cross cookie cutter..and I had a hard time finding one. Wal-mart, Michael's, JoAnne's, Dollar Tree, Target, Party City...No!
I was so happy to find one at Hobby Lobby. It's not a great quality cutter, but it worked. I also knew I wanted to try and put a heart inside the cross. I was excited to see that my tiny fondant heart cutter fit inside! 

 You will need: Hard Jolly Ranchers, Non-stick spray, parchment paper & a baking sheet.
Line the baking sheet with the parchment paper, then place the cutters on top. Next you will fill the cutters.
 As i said before, these candies are HARD!
I used my hubby's hammer-Hank-to crush them.
 Spray your cutters liberally with non-stick spray. I covered the tiny heart with a piece of paper towel so I would not have purple color in my red heart.Fill the cross with crushed candies. A spoon works great for this.
 For the tiny red heart, I cut the tip of a flexible straw  at an angle. Dipping the straw into the crushed candies, carefully fill the heart. This worked perfectly!
 I baked it just like this ..Bake on 275 degrees for 8-10 minutes.
 
 It came out looking a bit rugged..

..this time, I melted the candy with only the heart cookie cutter. Bake at 275 degrees for 8-10 minutes. As soon as I removed the baking sheet from the oven, I pressed the cross cookie cutter and upside down icing tip into the melted candy.
It worked. Wait about a minute, then carefully remove heart cutter. Wait another 4-5 minutes before gently removing candy from the cross cutter and icing tip.

Blue's turn!


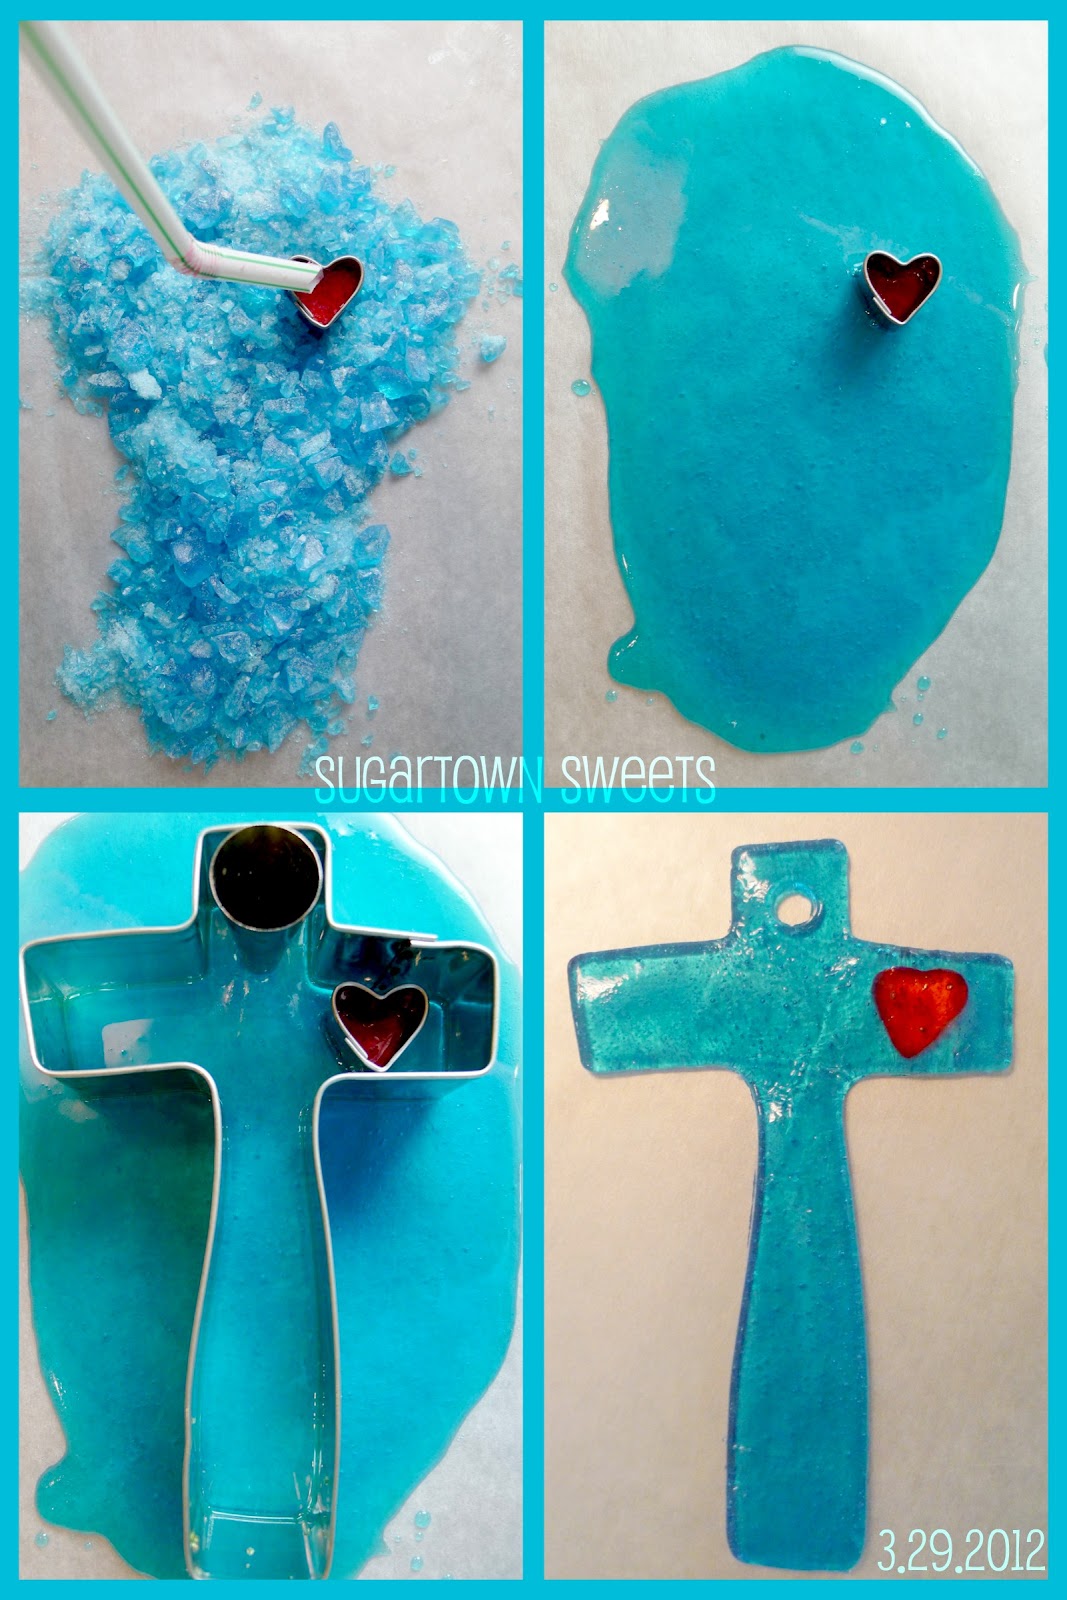
I love the stained glass effect of this one! I did not make this one with the heart..It would have disappeared into the color anyway.
I just threw the cupcake in for fun.

Wishing You All A
Blessed & Happy Easter
From
Sugartown Sweets!

Thank you so much for taking the time to stop by my blog today! 
I love all your comments and read each one. :o)

Saturday, March 24, 2012

Jolly Ranchers *Stained Glass* Easter Egg Ornaments

Jolly Ranchers *Stained Glass* Easter Egg Ornaments

You may remember the Candy Lollies I made back in January.
I had so much fun making those, so I thought it was time to revisit the melted Jolly Ranchers! 

This time, I'm making them EGG~stra special.  ;o)

I've also made Stained Glass Candy Crosses. Click here for instructions.
Wouldn't these make a beautiful holiday table!
The best thing about these are, they are so simple.
Plus, you need only one ingredient..
JOLLY RANCHERS!
You will also need a metal egg shaped cookie cutter.
Spray both the cookie cutter & icing tips with
 non-stick cooking spray. You will need the tips to make small holes in the ornaments so you can hang them. I used Wilton #10 & #12 icing tips.

If you've never crushed these candies before, they're VERY hard! Place them in a large baggie and just start smashing. I tried using the blunt end of my knife sharpener.
The candy actually cut the handle!
So I looked for, and found my hubby's trusty dusty hammer. This worked much better!
All smashed up and ready to go..
I learned a couple things making these..
#1. Don't skimp on the candy
Unless you don't mind...
 ....them turning out like this.
I found an adorable little cookie cutter at
Walmart. It took me three attempts to make this cute little bunny as I kept breaking
the little ears off...
Lesson #2. Keep the cookie cutter  design simple..at least for me anyway.
Success!
(only temporarily..i later broke his ear off during his photography session)
Place your candies on a parchment paper lined
baking sheet. Bake on 275 degrees 7-10 minutes,
depending on thickness of candy layer.
Remove from oven..
Immediately and firmly press cutter into candy. 

Turn the icing tip upside down and press into top of  ornament. 
Let cool 5-10 minutes. Remove icing tip and lift cookie cutter, peeling away the excess and gently pressing out the candy egg.
Whoo hoo..more success!
Here's another example of making a thin layer egg.
...........................
This one..I like!
I really liked the way this one turned out too!
Pretty pink, yellow and orange.
Check out the border!
It stayed intact!!
Ahhh..lovely...
Another border intact..really cool I thought. :o)
Just playing around..
All you need is candy..and a little time to have some fun!
*Stained Glass* Candies
Jolly Ranchers (hard version)
Non-stick cooking spray
Metal cookie cutter
Metal icing tip (i used Wilton #10 & #12)
Parchment paper
Ribbon
Preheat oven to 275 degrees
Crush candies, place on parchment lined baking sheet. 
Bake 7-10 minutes till completely melted.
Immediately and firmly, press metal cookie cutter into candy. Position metal icing tip upside down pressing firmly. Let cool 5-10 minutes.Remove icing tip. Lift candy off pan and  gently press your finished shaped candy from the cutter, peeling off any excess. 
Tie on your ribbon. Now you can admire your beautiful ornaments!
.................................................................................
Sweet & Happy Baking 
from
Sugartown Sweets!
...........................................................
I love reading all your comments!
Thank you for stopping by my blog! :o)